BannerWorld
14oz Vinyl Step and Repeat – Banner Only 7FT and Smaller
- SKU:
- VSR75S
- Availability:
- Usually ships in 2 business day - 2PM PST Cutoff
- Shipping:
- Calculated at Checkout
Description
Finishing Options
| Finishing Options | Examples | Description |
| Fabric Banners |  |
We cut the edge with a heated knife, which eliminates fraying and tear. No sewing or hemming required. |
| Vinyl Banners |  |
We sew 1" hems on the edges. Hemming reinforces the edges of vinyl banners and prevents fraying and tear. |
| Grommets |  |
Grommets are holes we install that allow you to fasten your banners. Grommets come in two diameters: 3/8"(small) - this is the default size used for most common use. 1/2" (big) - for mounting on a banner stand |
| Pole Pockets |
|
Using part of the graphic for the pocket sleeve. - Use part of customer's graphic for pole pockets. Note: sewing lines may interfere graphic. Be sure to design accordingly. |
| Reinforced Finishing | 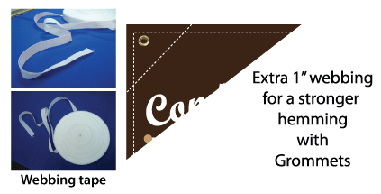 |
We put webbing tape to all edges of the banner. Useful for hanging in places with harsh weather, as this finishing provides extra reinforcement. |
| Velcro |  |
Either hook or loop will be mounted on the back of the banner. (the other part will be provided separately) 1"(W): $2/ft. 2"(W): $3/ft. |
| Wind Slit |  |
We put the wind slit evenly spaced out. Useful for hanging in places with high and flow $20 per each banner up to 30ft long Additional charge will be added for banners longer than 30ft. |
Turnaround
PRODUCT TURNAROUND TIME
- 1-2 business days
When placing an order for a large quantity of banner displays, please be advised that the processing and fulfillment time may be extended.
For larger quantities & sizes, please call us to confirm the turnaround time.
Turnaround Starts When
Production starts when you order is placed. Our daily Cutoff time is 1pm PST. If you have requested an eproof(s) for your order(s) it must be approved before 1pm PST, Monday through Friday. Any and all proofs approved after 1pm PST will be processed the next business day.
SHIPPING
We ship via FedEx
NEED BANNER SAME DAY?
Please call us and we can help in placing your order.
File Requirements
Please complete your order prior to uploading your artwork.
Artwork uploaded prior to having an order placed will be disregarded.
- Single Page PDF (Preferred)
- JPG (Preferred)
- PSD – Please flatten file
- EPS – Please embed all images. Outline all fonts and strokes.
- Ai – Please embed all images. Outline all fonts and strokes.
Don't Include Crop Marks or Bleed
Artwork at either full scale, 1/2 scale or 1/10 scale that is fine. Just make sure that when the file is being set up the DPI is compensated according to the scale.
- Full Scale – 150 DPI
- 1/2 Scale – 300 DPI
- 1/10 Scale – 450 DPI
- Outline all text
- Flattened PDF (Single Page) or JPEG file types only
- Remove all crop marks/bleed otherwise they will be printed
- File must be the same exact size as what is ordered (exception is Gallery wrap Fold Edge and Products with templates)
- CMYK only (we do not print Pantone/5th/Spot/RGB)
- 150 dpi
- If using a template, the file uploaded to our site should match the exact "template size" (different than "graphic size").
- Do not scale template files, just flatten them and save at 150 dpi
- Files over 200" can be scaled
- Under 300 mb for upload
- If the file is made in Indesign, please flatten the file in Illustrator or Photoshop and export to a JPEG ONLY as we don't recommend using Indesign at our facility.
- If using Compound Paths to create transparencies/shapes, please completely rasterize or flatten them into the file or they may print incorrectly.
Please make sure that your file is in CMYK format for print production with no bleed. It is not required.
For upload assistance please contact us directly: 1 (866) 602-4777
Eproof
Eproof: A digital trial sheet that is made to be checked and corrected if needed, before sending final artwork to be printed. Proofing is an optional $5 service we provide in which we allow you check what your file will look like before being printed. Each customer is limited to 3 eproofs per file being proofed. Additional eproofs will accrue an additional $10 per proof.
The following will be checked upon eproof request:
| • File Size | • Graphic(s) |
| • Resolution | • Margins for finishing |
| • Font(s) | • Overall positioning |
The following is to be checked by the customer:
| • Spelling | • Quantity |
| • Date Stamps | • Material |
| • Overall Design | • Finishing |
| • Size |
Once you approve the eproof(s) with OK to Print: you are stating that the eproof(s) are ready to print, and cannot be revised or reprinted without additional costs. Please be mindful that your turnaround (48 hour or 24 hour) does not start until we receive your approval for printing. BannerWorld.com is not responsible for any copy or design errors including: misspellings, date errors or color variation.
Cutoff time for approval for eproof(s) is 2:00 PM PST Monday through Friday. Failure to approve an eproof(s) on time will result in pushing production time back 1 business day, or rush fee's will be applied to your order. If expedited shipping is needed because of failure to approve a job on time, additional shipping fee's will be applied to your existing order.
Banner Care
• VINYL BANNERS
1. Always roll your banner with the design to the inside. Make sure the banner is completely dry before you roll it up. Do not store it when wet or damp.
2. NEVER FOLD THE BANNER!
3. Never use a rubber band to secure the banner roll as this will casue creases.
4. Loosely roll onto a rigid core or tube of some kind to ensure that it does not kink, crease or smash. 5
5. Store in a cool, dry location.
6. Clean with a soft, damp rag if dirty.
7. Do not use harsh substances like chemical cleansers or scrubber sponges on banner.
8. Keep the banner away from solvents such as paint thinner, acetone, alcohol, gasoline, etc.
9. Do not allow the banner to have ink to ink contact with itself or any other type of print or paint.
• FABRIC BANNERS
1. Always roll your banner with the design to the inside. Do not store it wet or damp.
2. NEVER FOLD THE BANNER!
3. Never use a rubber band to secure the banner roll as this will casue creases.
4. Loosely roll onto a rigid core or tube of some kind to ensure that it does not kink, crease or smash.
5. Do not use harsh substances like chemical cleansers or scrubber sponges on banner.
6. Keep the banner away from solvents such as paint thinner, acetone, alcohol, gasoline, etc.
7. Do not allow the banner to have ink to ink contact with itself or any other type of print or paint.
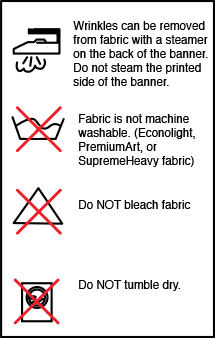
• CUSTOM TABLE THROW FABRIC CARE
1. If your exhibit fabric has a zipper, please keep zipper closed for storage.
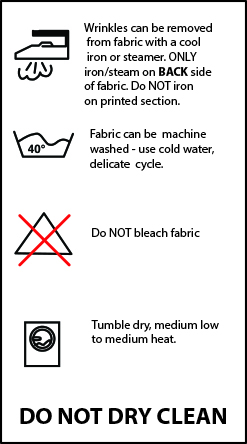
2. Wrinkles can be removed with cool iron or fabric steamer.
3. Fabric should NOT be stored when damp or wet. Store in cool, dry area.
4. For storing graphics please remove from plastic packaging that was provided and keep fabric in cool/dry place.
Washing
1. Your fabric graphic can be machine washed. Remove any hardware attached to the fabric prior to cleaning. Use MILD soap and cool water. Air dry fabric, dry on frame if frame is available.
2. Fabric must be COMPLETELY dry prior to storing.
3. DO NOT DRY CLEAN
Stain Treatment
1. Treat stain from backside of fabric.
2. Remove as much of debris as possible with a soft bristle brush (do NOT rub too hard)
3. Use a clean, lint-free white cloth. Lightly pat the stain from the outside moving in (to keep stain from spreading)
4. If a cleaning solution is used, rinse the area well with water to ensure NO solution is left on fabric.
5. Most stains can be treated with household fabric stain removers. It is ALWAYS important to test how the solution will react to the fabric. This can be tested by dabbing solution to a small corner of the fabric. Most household cleaners will provide treatment instructions depending on the type of stain.
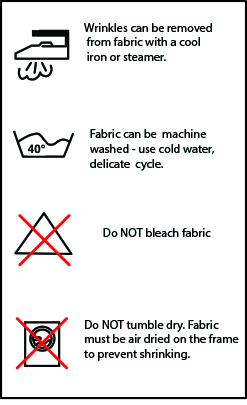
• STOCK TABLE THROW FABRIC CARE
Product meets National Fire Product Association (NFPA) standard 701 for Flame Resistance.
1. Wrinkles can be removed with cool iron or fabric steamer.
2. For storing graphics please remove from plastic packaging that was provided and keep fabric in cool/dry place. Fabric should NOT be stored when damp or wet.
3. Do NOT iron directly on printed sections of fabric.
Washing
1. Your fabric graphic can be machine washed. Use MILD soap and cool water. Tumble dry medium low - medium heat.
2. Fabric must be COMPLETELY dry prior to storing.
3. DO NOT DRY CLEAN
Stain Treatment
1. Treat stain from backside of fabric.
2. Remove as much of debris as possible with a soft bristle brush (do NOT rub too hard)
3. Use a clean, lint-free white cloth. Lightly pat the stain from the outside moving in (to keep stain from spreading)
4. If a cleaning solution is used, rinse the area well with water to ensure NO solution is left on fabric.
5. Most stains can be treated with household fabric stain removers. It is ALWAYS important to test how the solution will react to the fabric. This can be tested by dabbing solution to a small corner of the fabric. Most household cleaners will provide treatment instructions depending on the type of stain.
